If you can see this check that

Main Page


Acquisition and Introduction to Autopsy

User:
Password:

In this lab you will carry out forensic imaging to create a forensically sound copy of a device, and then use Autopsy to identify some of the potential evidence stored on the device.

To reset all the check buttons from a previous attempt click here

Question 1: Create Image

The following questions all work by manipulating an USB drive which is virtually connected to your VIRTUAL computer. Press the button below to connect the USB drive to your VIRTUAL PC. You do not need a real usb drive, and this has nothing to do with your own computer, as this only relates to your virtual computer. To disconnect the USB stick, go to the end of this section and click the appropriate button.

Press the button below to mount the USB Drive.

Tests - not attempted
Check Drive Not Already Mounted. UNTESTED
USB Drive Mounted. UNTESTED

Before we start acquisition we should create hash signature of the usb drive (/dev/loop1) The purpose of it is to verify that the content of the forensic image is exactly the same as the usb.

Create MD5 and SHA256 hash signature of the USB drive.
MD5 hash signature:
SHA256 hash signature:

Tests - not attempted
MD5 hash signature. UNTESTED
SHA256 hash signature UNTESTED

Question 2: Image Acquisition

Guymager is a forensic imaging tool with a graphical interface. The forensic imager was designed to support different image file formats, to be most user-friendly and to run fast. It has a high speed multi-threaded engine using parallel compression for best performance on multi-processor and hyper-threading machines.

Features include:

  • Fast due to multi-threaded, pipelined design and multi-threaded data compression
  • Easy user interface available in different languages
  • Generates flat (dd), EWF (E01) and AFF images, supports disk cloning
  • Extended acquisition info file

Using VNC, go to MAIN MENU > Forensic Tools > Guymager

In the case of Guymager, the usb device should appear as /dev/loop1. If it does not go to the Devices menu and select "add special device", and then in the box named "File name:" below the file browser window type "/dev/loop1" and then Open to add it.

Now select /dev/loop1 and right click on it and select "Acquire image".

Acquire Image
Figure 1: Acquire Image

Fill in the information as shown and press "Start".

Image Format
Figure 2: Select Image Format

Look into the usbsuspect.info file and verify the acquisition. Check that the hashes shown match the hashes you have generated earlier.

Tests - not attempted
Forensic image exists and is the correct name UNTESTED
MD5 Hash is correct. UNTESTED
SHA256 is correct. UNTESTED

Question 3: Analysing Image With Autopsy

Now that you have acquired the image of the USB drive, you will want to analyse the image. You will use Autopsy 4.9.1 to analyse the image and show what Autopsy can offer. This is a chance for you to understand the basics of the software allowing you to know where you are able to find the data you need when conducting analyses.


Open Autopsy. Go to MAIN MENU > Forensic Tools > Autopsy. Choose "New Case" from the popup menu.

It will prompt up asking for a "Case Name", so give it meaningful name such as Lab1. "Base Directory" is where your case will be saved - choose HOME directory /home/caine. Leave everything else as it is. Click "Next".

Image Format
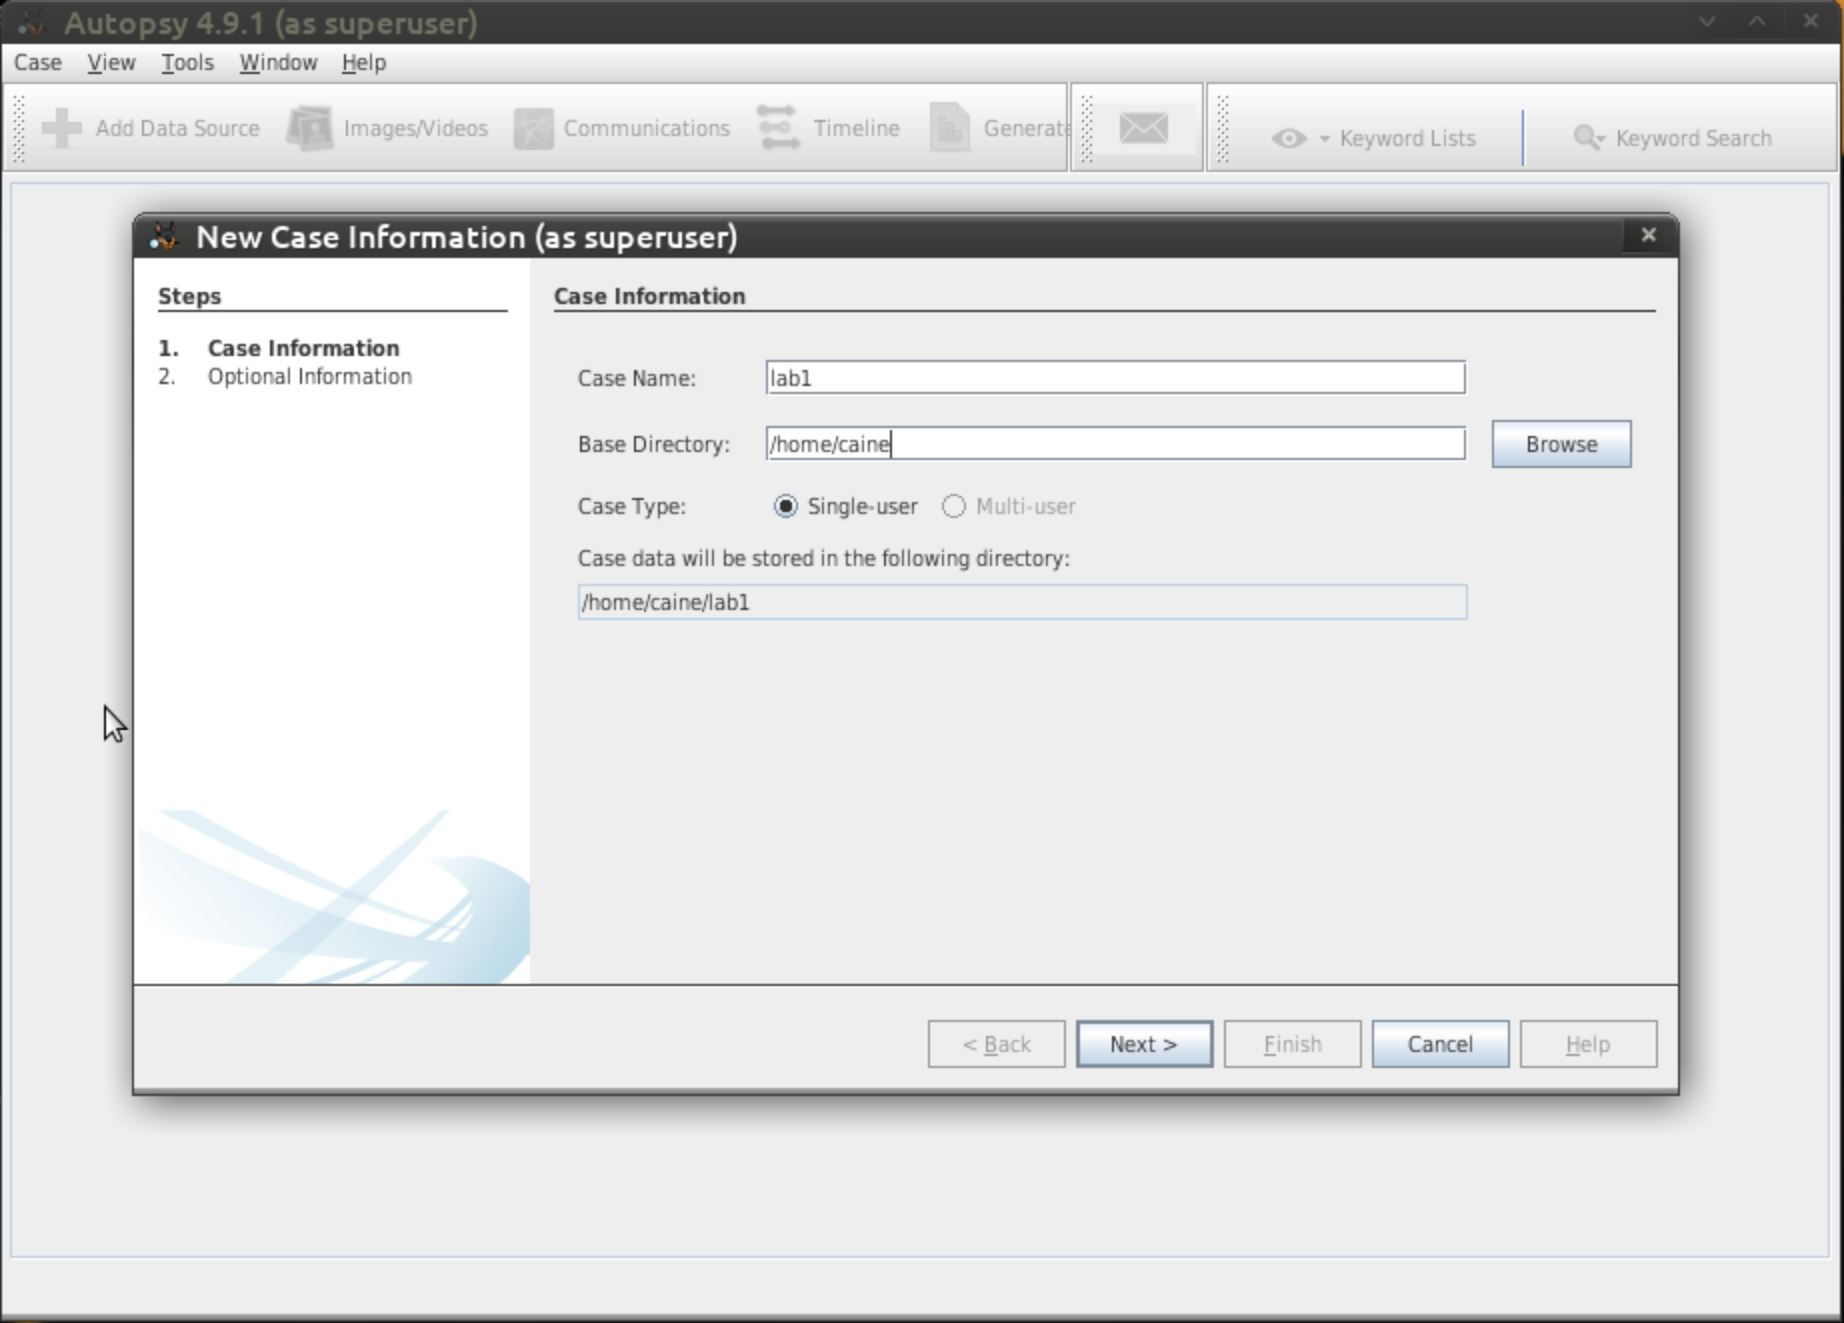
Figure 3: Case Information

As this is your first case, make the case number 001. As the examiner, fill your full name in and then click "Finish". Autopsy will start creating a database of your image. This may take a couple of minutes.

Image Format
Figure 4: Operational Information

Once created, it will ask you to select your data source. Click "Disk Image and VM file" to add your disk image.

Image Format
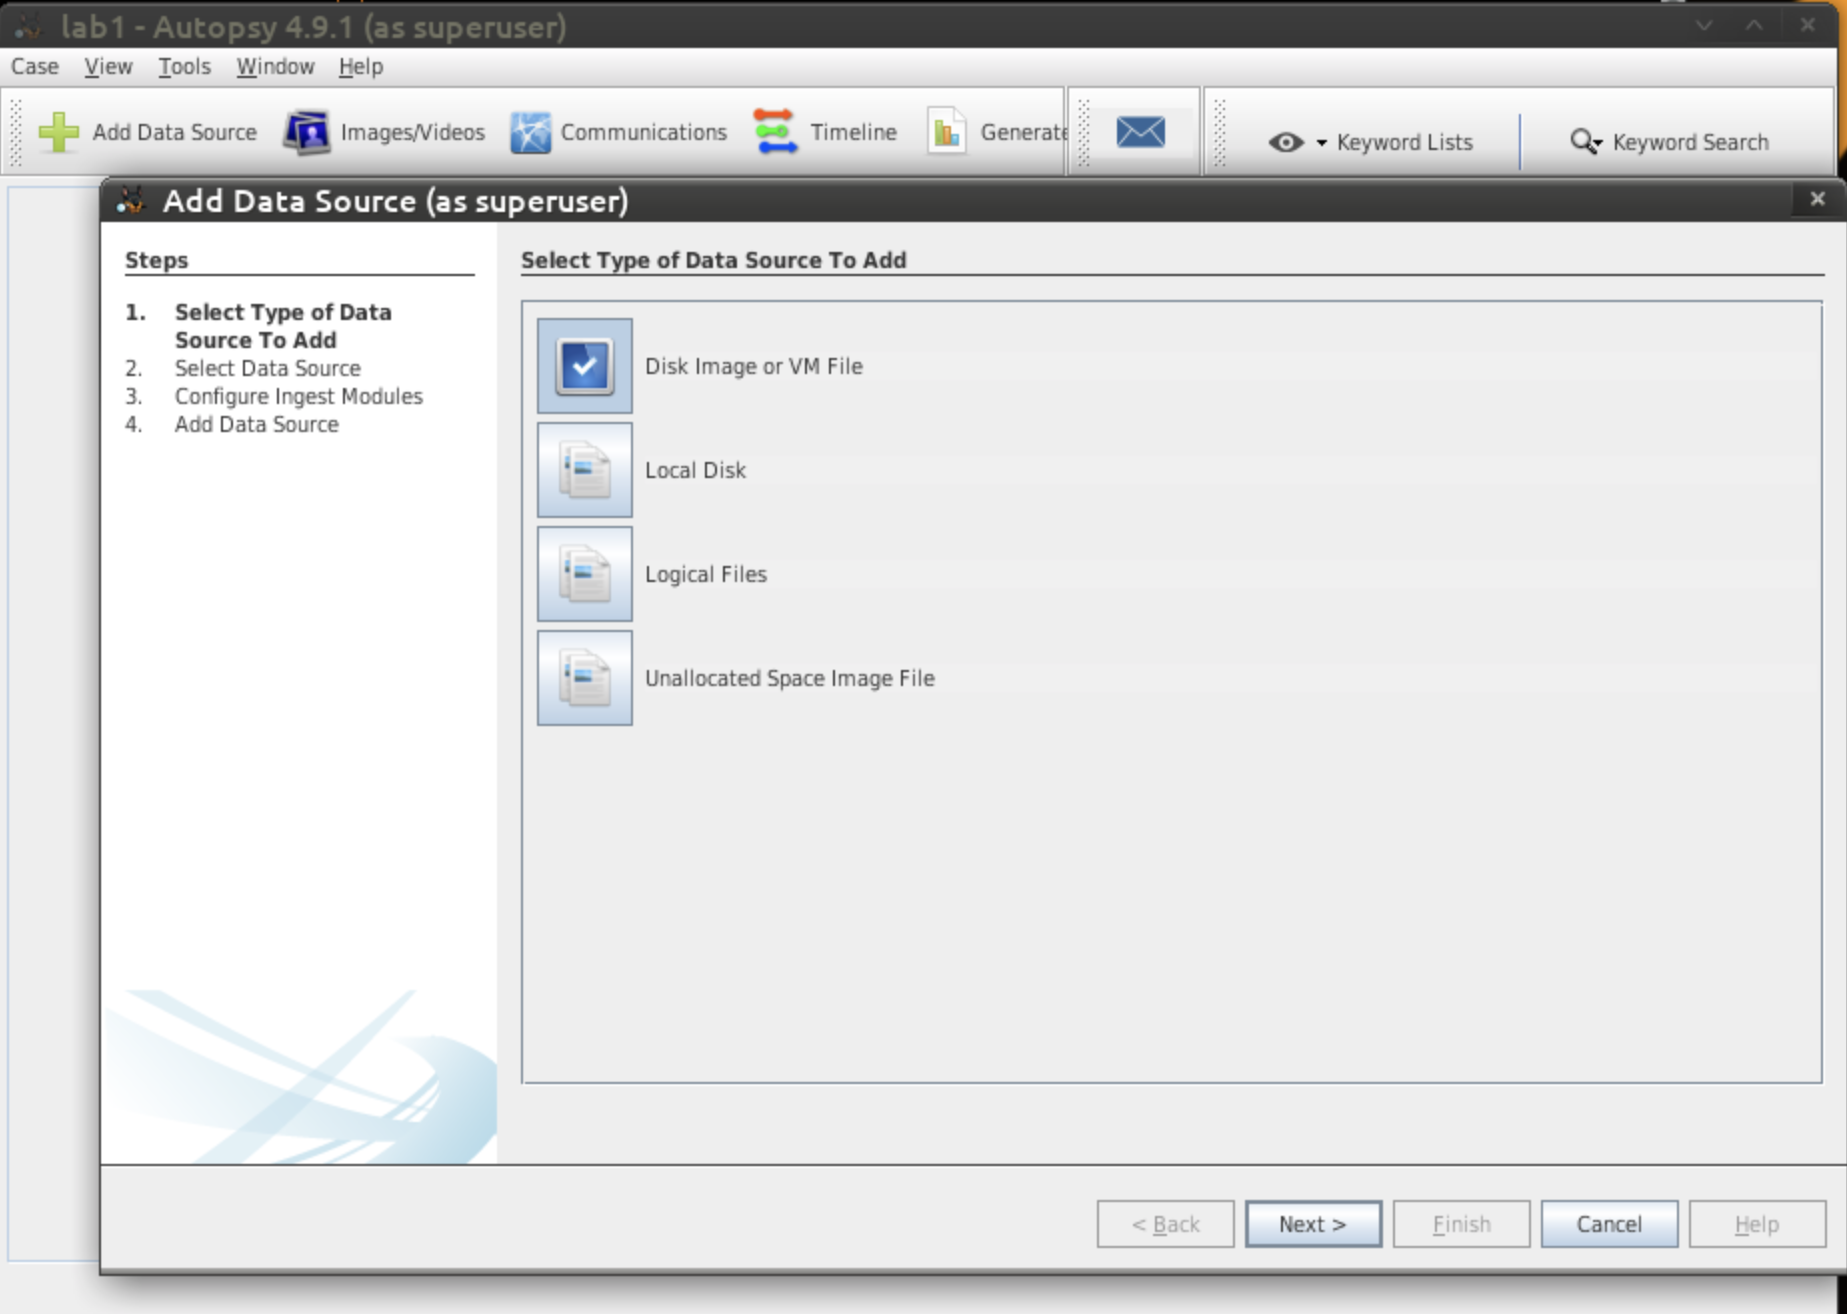
Figure 5: Data Source
Image Format
Figure 6: Select Data Source

Choose the modules that you want to ingest. For this lab Select All. Click on Keyword Search and select all available keyword lists. Click "Next", then "Finish".
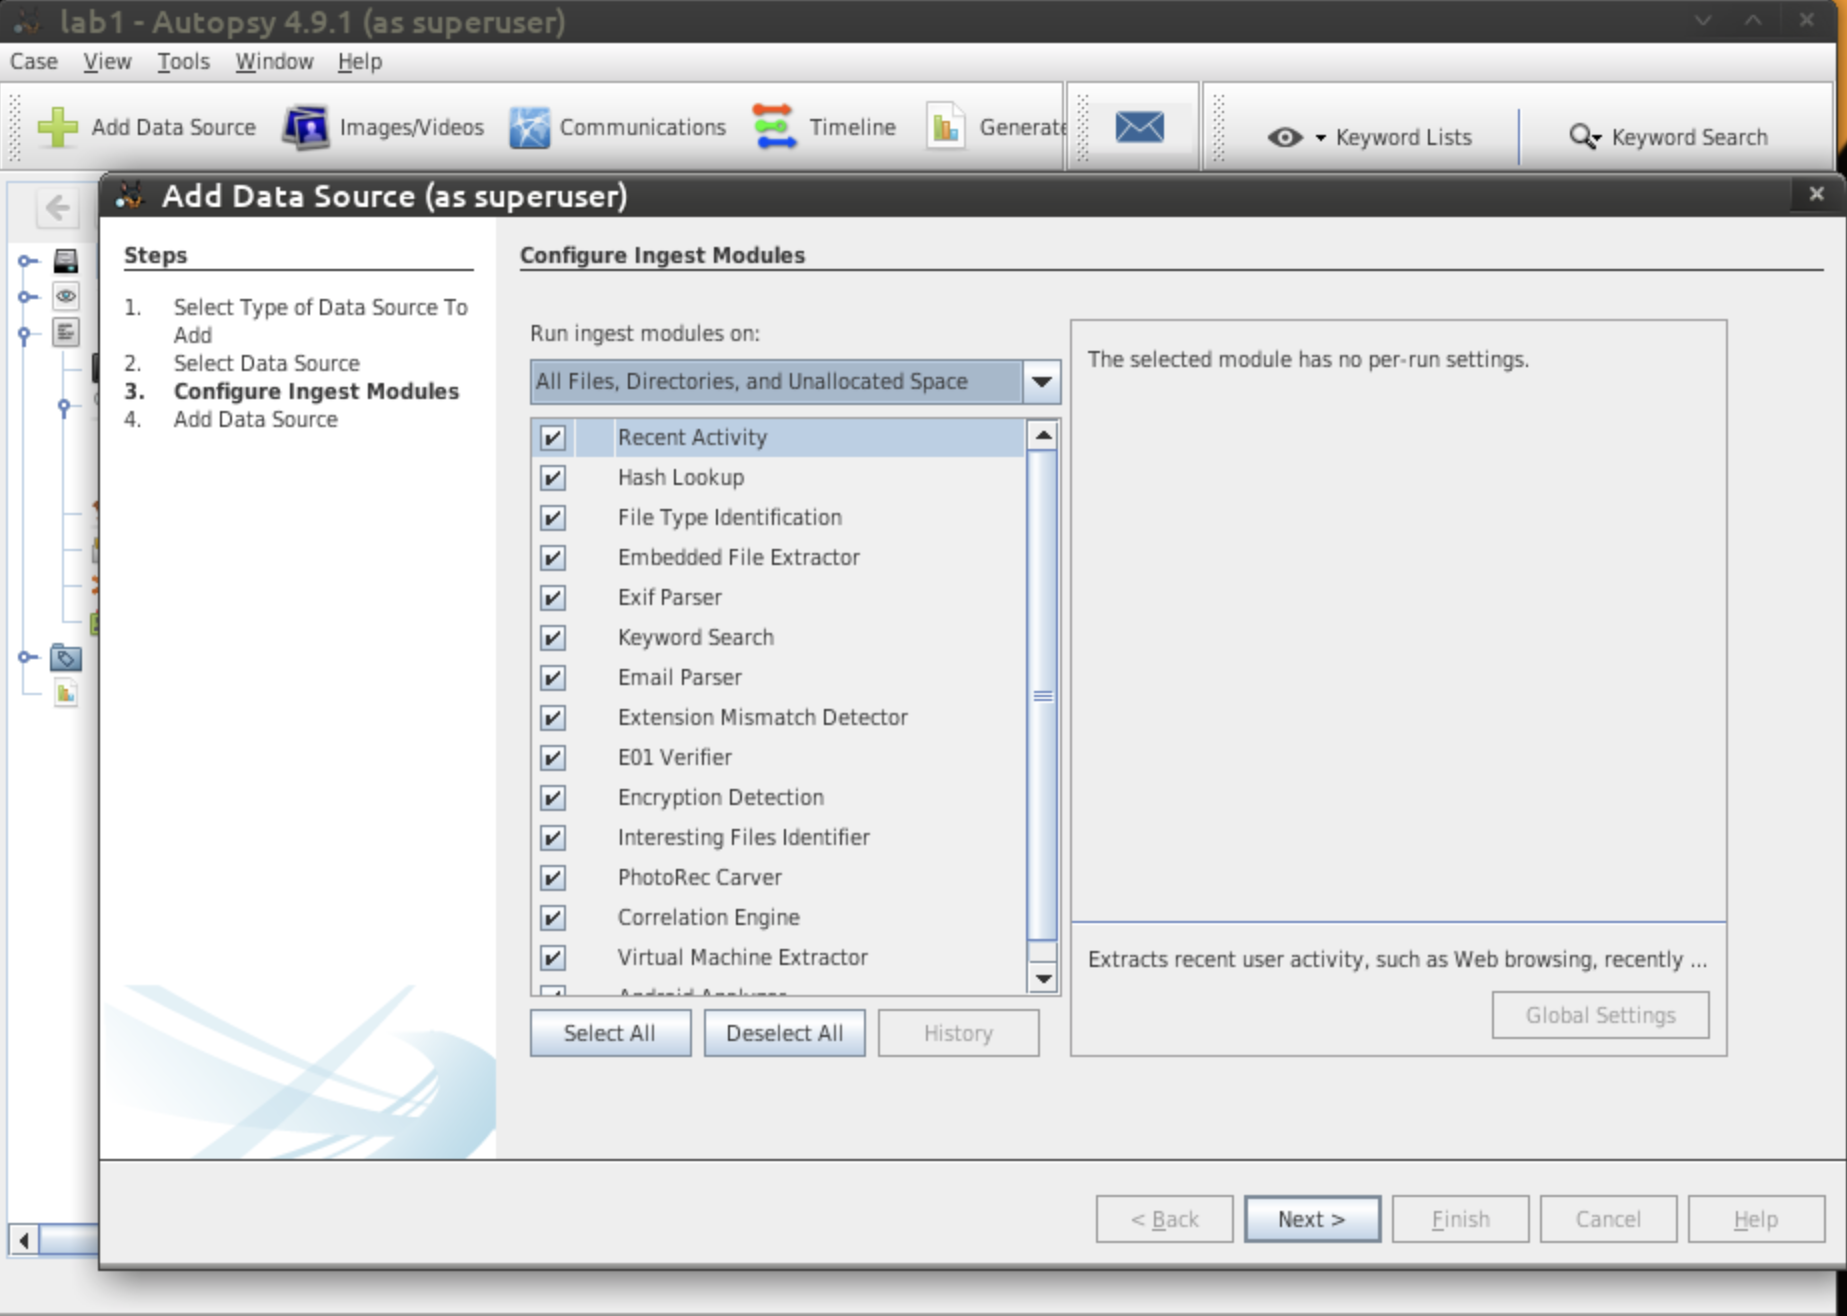
Image Format
Figure 7: Modules

Running all the ingest modules will take a few minutes. In the bottom right, watch the progress.

While you're waiting, Have a look at the Autopsy Quick start guide at: Autopsy User Guide. It gives you a brief explanation of the ingest modules and some example uses cases.

Once the ingestion is completed, you will see the interface as shown below. On the lefthand side is the "Tree View". It shows the saved results from the automated ingested modules you have selected. The "Result View" is on the top right, it shows the details after selecting something from the "Tree View". There will be options to choose to show different formats. On the bottom right there is the "Content View". It shows files in different formats and there are tabs to choose to view the file in different ways. To show data in this area, a file must be selected in the "Result View".

Image Format
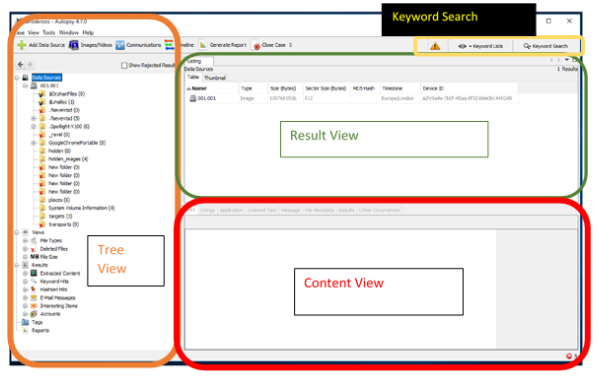
Figure 8: Autopsy View

Take some time to explore the different results in the tree and see what you can find.

For example, you should be able to see what files the suspect has deleted, and, in some cases, you will be able to extract the file and view it if you want. If you navigate to "Extracted Content", it will show you web contents which the suspect has been browsing. Have a look at each one and click into a URL. It will show you a lot of information. Look at the highlighted area, explore this area yourself. For example, look at "YouTube".

Tests - not attempted
Autopsy Case Created With Correct Name UNTESTED

Question 4: Analysing Image With Autopsy

Answer the following questions. This is a treasure hunt - it may take you a while to find the information, but while doing this you will become familiar with Autopsy. Remember to note how you found the answer. After you're done, check your answers with your tutors. If you're really stuck, get help.

  1. How many deleted files were found by Autopsy?

  2. There is one file with an "extension mismatch". What is the filename and path? (exclude image name and leading slash)

  3. How many files contain EXIF metadata?

  4. How many different cameras were they taken with?

  5. Find the photo which shows part of a keyboard. What is the filename, and when and where was the photo taken (latitude/longitude and address/description)?

  6. Given the identified location, in which public building might the photo have been taken?

  7. What browser did the suspect use?

  8. What program was downloaded from the internet and where was it stored?

  9. When did the user search for "how to stay off grid"?(FORMAT:YYYY-MM-DD 00:00:00 BST)

  10. Following this web search, the user accessed a related website. What is its URL?

  11. Which email address was used for webmail? How many unread messages were in the inbox when it was first accessed?

Tests - not attempted
Q1. Deleted Files UNTESTED
Q2. File With Extension Mismatch UNTESTED
Q3. Files Containing EXIF Metdata UNTESTED
Q4. Different Cameras UNTESTED
Q5. File Name and Location Data UNTESTED
Q6. Public Building UNTESTED
Q7. Browser UNTESTED
Q8. Application Downloaded UNTESTED
Q9. User Search Time UNTESTED
Q10. Related Web Address UNTESTED
Q11. Email Address with Unread Messages UNTESTED


Centos 7 intro: Paths | BasicShell | Search
Linux tutorials: intro1 intro2 wildcard permission pipe vi essential admin net SELinux1 SELinux2 fwall DNS diag Apache1 Apache2 log Mail
Caine 10.0: Essentials | Basic | Search | Acquisition | SysIntro | grep | MBR | GPT | FAT | NTFS | FRMeta | FRTools | Browser | Mock Exam |
CPD: Cygwin | Paths | Files and head/tail | Find and regex | Sort | Log Analysis
Kali: 1a | 1b | 1c | 2 | 3 | 4a | 4b | 5 | 6 | 7a | 8a | 8b | 9 | 10 |
Kali 2020-4: 1a | 1b | 1c | 2 | 3 | 4a | 4b | 5 | 6 | 7 | 8a | 8b | 9 | 10 |
Useful: Quiz | Forums | Privacy Policy | Terms and Conditions

Linuxzoo created by Gordon Russell.
@ Copyright 2004-2023 Edinburgh Napier University