If you can see this check that
| next section | prev section | up | prev page | next page |
In the preceding section you learned how to change the permissions on individual file and directories using the chmod command. You should also be aware of the default permissions assigned to all of your files and directories at the time you create them. You can list or change the default permission by using the umask command.
Default permissions are assigned by the system whenever you create a new file or directory, and these are governed by the umask setting. Unless set up by yourself or the system administrator, your default umask setting will be 0000, which means that new files you create will have read and write permission for everyone (0666 or -rw-rw-rw-), and new directories that you create will have read, write and search permissions for everyone (0777 or drwxrwxrwx). You will almost certainly want to change your umask setting to a non-zero value, to make the default values to the newly created files and directories more restrictive.
The number given as a parameter to the umask command works in a opposite manner to the number given to the chmod command. The 'mask' serves to remove permissions as opposed to granting them. That is, the digits in the umask number are 'subtracted' from 777 for directories or 666 for files when you are creating their initial permissions. For example, suppose you type:
% umask 022Then when you create new files their default permissions will be 644 (666 minus 022, i.e. -rw-r--r--). When you create new directories their default permissions will be 755 (drwxr-xr-x). If the umask value were instead set to 077, your default permissions would be 600 (-rw-------) and your default directory permissions would be 700 (drwx------).
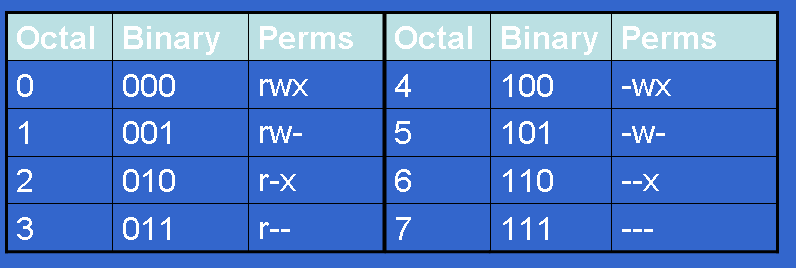
For reference, the following table shows the mappings between umask values
and default permissions. BE VERY CAREFUL not to confuse umask and chmod
permissions, as they are entirely different (a binary inversion of each other)
and are NOT INTERCHANGABLE!!
To discover what umask you are currently working with, type:
% umask
Here are some examples of settings for umask
If you set umask at the shell prompt, it will only apply to the current login session. It will not apply to future login sessions. To apply umask setting automatically at login, you would add the umask command to your .login file (C Shell users) or .profile (Bourne and Korn Shell users).
| Centos 7 intro: | Paths | BasicShell | Search |
| Linux tutorials: | intro1 intro2 wildcard permission pipe vi essential admin net SELinux1 SELinux2 fwall DNS diag Apache1 Apache2 log Mail |
| Caine 10.0: | Essentials | Basic | Search | Acquisition | SysIntro | grep | MBR | GPT | FAT | NTFS | FRMeta | FRTools | Browser | Mock Exam | |
| Caine 13.0: | Essentials | Basic | Search | |
| CPD: | Cygwin | Paths | Files and head/tail | Find and regex | Sort | Log Analysis |
| Kali 2020-4: | 1a | 1b | 1c | 2 | 3 | 4a | 4b | 5 | 6 | 7 | 8a | 8b | 9 | 10 | |
| Kali 2024-4: | 1a | 1b | 1c | 2 | 3 | 4a | 4b | 5 | 6 | 7 | 8a | 8b | 9 | 10 | |
| Useful: | Quiz | Privacy Policy | Terms and Conditions |
Linuxzoo created by Gordon Russell.
@ Copyright 2004-2025 Edinburgh Napier University