If you can see this check that
| next section | up | prev page | next page |
From any of the pages which have a Virtual Machine control panel embedded in the top right corner, log in with your registered details. If you have not already registered, use the drop down jump list to "Register for an account". Registration information is used only for security and to improve your experience. It is not used for marketing or mailing lists.
Click on "Join Queue". Provided there is a virtual machine available, you will be given the machine control page shown in Figure 3. If there are no machines currently unused, you will be placed in a queue.
Your position in the queue, your speed in getting a machine, the amount of time you get using a machine, and the things you can do with the machine once you have one are all related to the information you give during registration. This can range from 10 minutes of machine time, up to 2 hours of guaranteed time with automatic time extensions if the site is quiet (which is called HOLD time in the interface).

Once you are in the queue, or have your own virtual machine, the system decides on whether you are using your machine via a number of mechanisms. One of these is that there must be a control panel running somewhere on your machine. Almost all pages in this site have a control panel, so you can navigate freely about the site without leaving a page with a control panel running in the background. However, if none of you web browser's windows have a control panel on them, then your VM machine will shutdown within a few minutes and you will be dequeued.
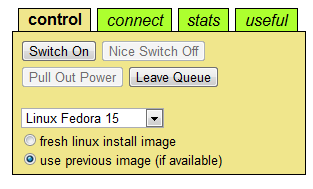
To start your machine you first need to decide what type of machine you want. The system can have many types of machine and operating systems, like linux or Windows 7. To learn Linux use "Linux Fedora 15". Next decide if you want to start with a new fresh image (with no files altered) or reuse your last image (with all the changes you have made so far). This previous image approach is not precise and reliable (sometimes it will not give you your most up-to-date image when you request it). It tried hard to keep your work between reboots, but this is not guarenteed. Try not to reboot in the middle of a tutorial.
Once you have decided on the image state, simply press Switch On.
Like anything which is worth doing is also worth waiting for! Your machine does take some time to boot up from switch on to being useful. This process can be monitored in a number of ways, but the boot progress bar is one of the simplest methods. Here the bar grows over time, and when it spans the whole box your machine is ready for use. To indicate this the bar is replaced with "complete" as seen in Figure 5. This bar can take quite a while, depending on a number of factors, so do not be tempted to keep crashing your machine and restarting. Recovering from a previous crash is one of the biggest reasons why the boot process can take ages! If you are having real problems the only alternative may be to reboot with a fresh image, but this is should be seen as a LAST RESORT.
So your machine is operational? Now you need to be able to log into it. There are a variety of ways to do this, and a reminder of them can be seen on the "connect" tab of the control panel. You can telnet to the machine and you can ssh to the machine. Once you have been running the tutorials for a while, you can also use your machine as a web server, but this is only operational after you personally run your own web server.
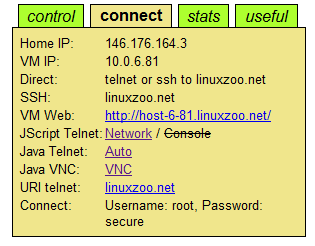
Initially your have only one user account on your machine, the superuser account called "root". Its password is "secure". Many of the tutorials use the root user. However, some of the initial "user-based" tutorials use another account called "demo" (password "demo"). When needed the demo account will be automatically created by the tutorials in question. If you are following one of the demo tutorials, remember to actually log in as the demo user, and not as root! This is the easiest way to get completely confused!! Look at the tutorial you are working on and use the username it indicates. If you are already logged in as root, you can change to the demo user by typing in the cryptic looking command:
su - demo
This is "su" + space + minus sign + space + "demo" + the return key. Normally in this document this would be written as:
> su - demo
where the ">" sign indicates you type the rest of the line in at the shell prompt. You never type in this first ">" sign... in only indicates that the rest of the line needs to be typed by yourself.
If you try to log in before your machine is fully running, it is likely to disconnect you immediately. Note that clicking on "Login using telnet" from some browsers (e.g. some versions of mozilla) will fail due to a bug in those browsers. You can use the command prompt of windows too (Start menu, then Run, and simply type "telnet linuxzoo.net").
From the control window you can see many different buttons and pieces of information in different tab panes. Most of them will be covered later. A state of HALT means your machine is not switched on. Net Usage indicates how much data your machine has transferred over the network, while CPU Usage indicates how heavily loaded your machine has been. Services Detected is useful to find out if your machine is able to be logged into, but more about that later.
The control window takes up quite a bit of space. You can minimise this space at the expense of not being able to read most of the information by clicking on "minimise" in the top right corner. Click on "maximise" to restore the window. The last click on this is remembered by your browser, so if your return the next day you may have to maximise the window before you can log in.
When you are finished using your machine you should press the "Nice Switch Off" button. This will close your machine down and switch it off in a nice and friendly way which will not damage your files. If you will not be reusing this image, or are having big problems with the system, or just want to see the system start up from a bad shutdown, you can press "Pull Out Power". This is identical to pulling the power out the machine, and it should die instantly.
Note that the startup and shutdown mechanisms are self-managing. If for instance you try to shutdown your machine and it seems to hang up then do not panic. Just wait a few minutes. The system will detect the problem and take the required action to kill your machine. If a problem persists for more than 5 minutes, you may find that the system locks you out of the control panel. In this case feel free to drop the site manager some email. Remember however this service is a privilage not a right, and my response time may be significantly long.
Your simulated machine is effectively a 200 MHz processor (e.g a Pentium 200), with 512 MBytes of RAM. But really it is running on a 2000+ MHz server machine, with many GBytes of RAM. This resource is shared between all the simulated machines running on the server. Each server runs between 10 and 30 simulations, depending on the resources of the server in question.
Considering that you are using a shared resource, if you do something which requires considerable CPU or network resources, then you will be slowing everyone else down on the server. Your resource requirements are monitored automatically, and if you seem to be doing something "resource greedy" you may be kicked off your machine. At the very least, your machine's priority will start to drop, and this may mean your machine starts to get quite sluggish.
The system needs to know your own desktop machine's IP number. This is usually simple to obtain. However, some network configurations hide this information. The linuxzoo site can handle this type of configuration, but it may ask you for your Virtual Machine's IP number when you try to use telnet. SSH will not operate in such configurations. Your virtual machine's IP number can be found in the connect tab of your virtual machine's control window. You will be warned that this situation exists by the message "SHARED IP MODE" in the bottom of your control window. This does not effect anything else.
If you disable Javascript the site will not operate, and if you are blocking cookies the site might appear to work a little then log you out. Some things need a Java browser plugin. I also use iframes, CSS, and other magical amulets. If you have an unusually high security setting on your browser then you will also be secure in the knowledge that this site wont work for you. I have tested the site on a variety of browsers, and except for the interactive tutorials things like IE, Netscape, and Firefox all work even with quite old version numbers. The iframes do background reloads, but this should not mess up your back button history except in some badly broken browsers.
I have made little attempt to support non DOM2 compatible browsers in general. The system will usually degrade gently, and by and large you should always be able to book machines and log into them. However, the interactive tutorials all use asychronous XML transfers, and if your browser does not support this you are doomed to never be able to complete a tutorial. This seems to include IE on the Mac. But then if you are using a mac you probably dont need this site anyway...
By using the machines you effectively agree to Edinburgh Napier University's AUP (Acceptable Use Policy). You also agree to mine, which is basically:
Linux often comes with a graphical interface, known as X. X provides only the code to produce graphics, and not the menus or screen layout, which is provided by a "window manager". Managers include KDE and Gnome. The GUI on Fedora 15 looks like this:
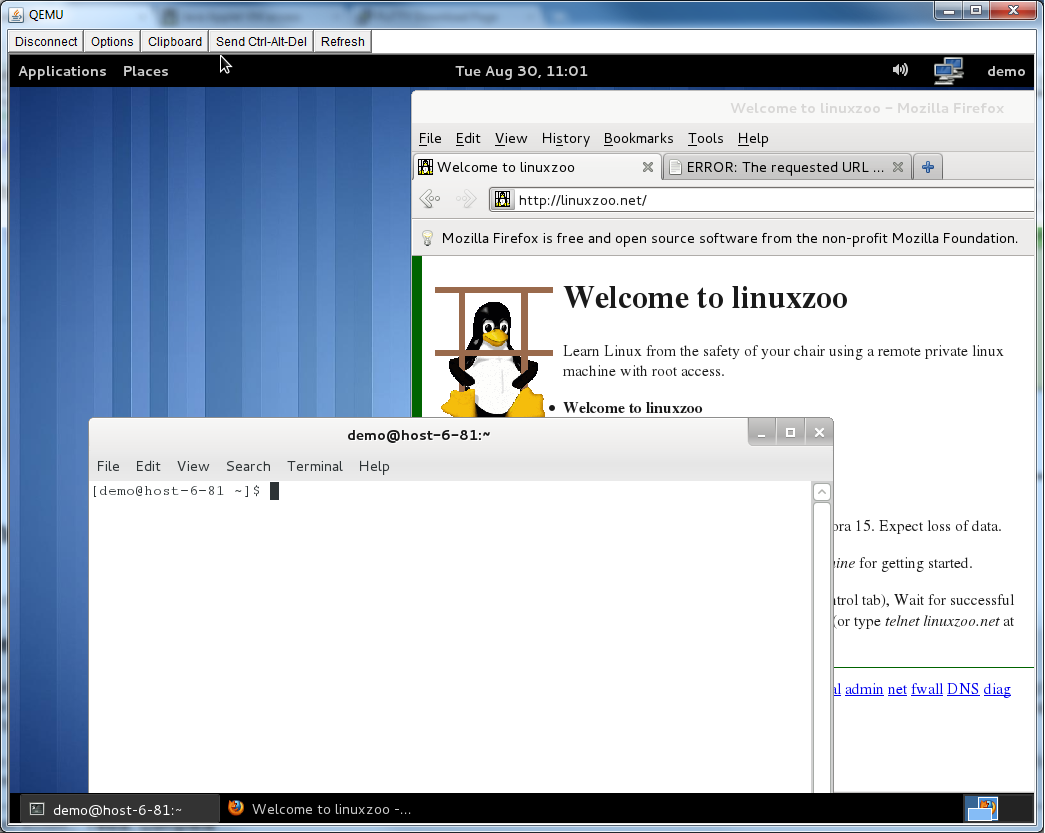
The simulated machine has graphical managers installed, but these all use up considerable CPU time. None of the tutorials require the use of a GUI. Please refrain from running a graphical interface in the simulations except for short periods of fun and personal gratification. You need a reasonable speed of internet connection plus java. Please disconnect when not in use.
| Centos 7 intro: | Paths | BasicShell | Search |
| Linux tutorials: | intro1 intro2 wildcard permission pipe vi essential admin net SELinux1 SELinux2 fwall DNS diag Apache1 Apache2 log Mail |
| Caine 10.0: | Essentials | Basic | Search | Acquisition | SysIntro | grep | MBR | GPT | FAT | NTFS | FRMeta | FRTools | Browser | Mock Exam | |
| Caine 13.0: | Essentials | Basic | Search | |
| CPD: | Cygwin | Paths | Files and head/tail | Find and regex | Sort | Log Analysis |
| Kali 2020-4: | 1a | 1b | 1c | 2 | 3 | 4a | 4b | 5 | 6 | 7 | 8a | 8b | 9 | 10 | |
| Kali 2024-4: | 1a | 1b | 1c | 2 | 3 | 4a | 4b | 5 | 6 | 7 | 8a | 8b | 9 | 10 | |
| Useful: | Quiz | Privacy Policy | Terms and Conditions |
Linuxzoo created by Gordon Russell.
@ Copyright 2004-2025 Edinburgh Napier University